이번 과제는 JPA 심화라는 주제로, 동적 쿼리와 성능 최적화 그리고 배포와 대용량 처리까지 접근해볼 수 있는 과제였습니다. 도전 기능으로 갈수록 내용이 조금 많아져서, 필수 기능과 도전 기능을 분리하여 작성하겠습니다. 도전 기능에 대한 회고는 여기에 있습니다.
1. 과제 해결
1. 코드 개선 퀴즈 - @Transactional의 이해
-
해결 과정
클래스에
@Transactional(readOnly = true)이 존재하고 있습니다. 따라서, 읽기 전용이 아닌@Transactional을saveTodo()에 적용했습니다.package org.example.expert.domain.todo.service; ... // AS-IS @Service @RequiredArgsConstructor @Transactional(readOnly = true) public class TodoService { private final TodoRepository todoRepository; private final WeatherClient weatherClient; public TodoSaveResponse saveTodo(AuthUser authUser, TodoSaveRequest todoSaveRequest) { User user = User.fromAuthUser(authUser); ... // TO-BE @Service @RequiredArgsConstructor @Transactional(readOnly = true) public class TodoService { private final TodoRepository todoRepository; private final WeatherClient weatherClient; @Transactional public TodoSaveResponse saveTodo(AuthUser authUser, TodoSaveRequest todoSaveRequest) { User user = User.fromAuthUser(authUser); ...
2. 코드 추가 퀴즈 - JWT의 이해
-
해결 과정
package org.example.expert.domain.user.entity; ... @Getter @Entity @NoArgsConstructor @Table(name = "users") public class User extends Timestamped { @Id @GeneratedValue(strategy = GenerationType.IDENTITY) private Long id; @Column(unique = true) private String email; private String password; @Enumerated(EnumType.STRING) private UserRole userRole; private String nickname; public User(String email, String password, UserRole userRole, String nickname) { this.email = email; this.password = password; this.userRole = userRole; this.nickname = nickname; } public static User fromAuthUser(AuthUser authUser) { return new User(authUser.id(), authUser.email(), authUser.userRole(), authUser.nickname()); } ...nickname이란 필드를UserEntity 에 추가하고, 관련DTO와 생성자들에 추가했습니다.package org.example.expert.domain.auth.dto.request; ... @Getter @NoArgsConstructor @AllArgsConstructor public class SignupRequest { @NotBlank @Email private String email; @NotBlank private String password; @NotBlank private String userRole; @NotBlank private String nickname; }nickname을JWT createToken의 클레임으로 추가하여 클라이언트에서JWT를 통해nickname에 접근하도록 합니다.package org.example.expert.config; ... public String createToken(Long userId, String email, UserRole userRole, String nickname) { Date date = new Date(); return BEARER_PREFIX + Jwts.builder() .setSubject(String.valueOf(userId)) .claim("email", email) .claim("userRole", userRole) .claim("nickname", nickname) .setExpiration(new Date(date.getTime() + TOKEN_TIME)) .setIssuedAt(date) // 발급일 .signWith(key, signatureAlgorithm) // 암호화 알고리즘 .compact(); }AuthUserArgumentResolver에서도AuthUser를 만들 때nickname도 추가해줍니다. 이렇게 하여 정의한 어노테이션을 통해 유저 정보를 불러올 때nickname을 사용할 수 있게 해줍니다.package org.example.expert.config; ... public Object resolveArgument( @Nullable MethodParameter parameter, @Nullable ModelAndViewContainer mavContainer, NativeWebRequest webRequest, @Nullable WebDataBinderFactory binderFactory ) { HttpServletRequest request = (HttpServletRequest) webRequest.getNativeRequest(); // JwtFilter 에서 set 한 userId, email, userRole 값을 가져옴 Long userId = (Long) request.getAttribute("userId"); String email = (String) request.getAttribute("email"); UserRole userRole = UserRole.of((String) request.getAttribute("userRole")); String nickname = (String) request.getAttribute("nickname"); return new AuthUser(userId, email, userRole, nickname); } }이를 위해, 아래처럼
AuthUser클래스에도nickname을 추가해줍니다. 이 과정에서AuthUser의 타입을record로 변경했습니다.package org.example.expert.domain.common.dto; import org.example.expert.domain.user.enums.UserRole; public record AuthUser(Long id, String email, UserRole userRole, String nickname) { }이렇게 하면 클라이언트에서 JWT를 통해
nickname값에 대해 접근할 수 있습니다.
3. 코드 개선 퀴즈 - JPA의 이해
-
해결 과정
TodoController에 날씨 및 날짜 필터링 파라미터를 추가합니다.package org.example.expert.domain.todo.controller; ... @GetMapping("/todos") public ResponseEntity<Page<TodoResponse>> getTodos( @RequestParam(defaultValue = "1") int page, @RequestParam(defaultValue = "10") int size, @RequestParam(required = false) String weather, @RequestParam(required = false) @DateTimeFormat(iso = ISO.DATE) LocalDate startDate, @RequestParam(required = false) @DateTimeFormat(iso = ISO.DATE) LocalDate endDate ) { return ResponseEntity.ok(todoService.getTodos(page, size, weather, startDate, endDate)); } ...TodoService에서 호출하는 메소드의 인자를 수정합니다.package org.example.expert.domain.todo.service; ... public Page<TodoResponse> getTodos(int page, int size, String weather, LocalDate startDate, LocalDate endDate) { Pageable pageable = PageRequest.of(page - 1, size); Page<Todo> todos = todoRepository.findAllWithConditions(weather, startDate, endDate, pageable); return todos.map(todo -> new TodoResponse( todo.getId(), todo.getTitle(), todo.getContents(), todo.getWeather(), new UserResponse(todo.getUser().getId(), todo.getUser().getEmail()), todo.getCreatedAt(), todo.getModifiedAt() )); } ...TodoRepository에 문제의 요구사항대로 JPQL을 활용하여 날씨와 날짜 필터링 기능에 대한 메소드를 추가합니다.package org.example.expert.domain.todo.repository; ... public interface TodoRepository extends JpaRepository<Todo, Long> { ... @Query(""" SELECT t FROM Todo t LEFT JOIN FETCH t.user u WHERE (:weather IS NULL OR LOWER(t.weather) LIKE LOWER(CONCAT('%', :weather, '%'))) AND (:startDate IS NULL OR t.modifiedAt >= :startDate) AND (:endDate IS NULL OR t.modifiedAt <= :endDate) ORDER BY t.modifiedAt DESC """) Page<Todo> findAllWithConditions(String weather, LocalDate startDate, LocalDate endDate, Pageable pageable); }
4. 테스트 코드 퀴즈 - 컨트롤러 테스트의 이해
-
해결 과정
아래 코드와 같이 200 OK에 관한 부분을
Bad Request로 변경해줍니다.package org.example.expert.domain.todo.controller; ... // AS-IS @Test void todo_단건_조회_시_todo가_존재하지_않아_예외가_발생한다() throws Exception { // given long todoId = 1L; // when when(todoService.getTodo(todoId)) .thenThrow(new InvalidRequestException("Todo not found")); // then mockMvc.perform(get("/todos/{todoId}", todoId)) .andExpect(status().isOk()) .andExpect(jsonPath("$.status").value(HttpStatus.OK.name())) .andExpect(jsonPath("$.code").value(HttpStatus.OK.value())) .andExpect(jsonPath("$.message").value("Todo not found")); } // TO-BE @Test void todo_단건_조회_시_todo가_존재하지_않아_예외가_발생한다() throws Exception { // given long todoId = 1L; // when when(todoService.getTodo(todoId)) .thenThrow(new InvalidRequestException("Todo not found")); // then mockMvc.perform(get("/todos/{todoId}", todoId)) .andExpect(status().isBadRequest()) .andExpect(jsonPath("$.status").value(HttpStatus.BAD_REQUEST.name())) .andExpect(jsonPath("$.code").value(HttpStatus.BAD_REQUEST.value())) .andExpect(jsonPath("$.message").value("Todo not found")); }
5. 코드 개선 퀴즈 - AOP의 이해
-
해결 과정
AOP 적용이 필요한 클래스와 메소드를 명확하게 입력하고,
@Before로 변경합니다.package org.example.expert.aop; ... // AS-IS @After("execution(* org.example.expert.domain.user.controller.UserController.getUser(..))") public void logAfterChangeUserRole(JoinPoint joinPoint) { String userId = String.valueOf(request.getAttribute("userId")); String requestUrl = request.getRequestURI(); LocalDateTime requestTime = LocalDateTime.now(); log.info("Admin Access Log - User ID: {}, Request Time: {}, Request URL: {}, Method: {}", userId, requestTime, requestUrl, joinPoint.getSignature().getName()); } } // TO-BE @Before("execution(* org.example.expert.domain.user.controller.UserAdminController.changeUserRole(..))") public void logBeforeChangeUserRole(JoinPoint joinPoint) { String userId = String.valueOf(request.getAttribute("userId")); String requestUrl = request.getRequestURI(); LocalDateTime requestTime = LocalDateTime.now(); log.info("Admin Access Log - User ID: {}, Request Time: {}, Request URL: {}, Method: {}", userId, requestTime, requestUrl, joinPoint.getSignature().getName()); }
6. JPA Cascade
-
해결 과정
cascade.persist를 이용하여 담당자로 todo를 생성한 유저를 같이 자동 지정되도록 합니다. 지금은 요구사항에서 유저를 같이 자동 지정되도록 저장만 필요한 상황이기 때문에persist를 사용했습니다.package org.example.expert.domain.todo.entity; ... // AS-IS @OneToMany(mappedBy = "todo", cascade = CascadeType.REMOVE) private List<Comment> comments = new ArrayList<>(); @OneToMany(mappedBy = "todo") private List<Manager> managers = new ArrayList<>(); ... // TO-BE @OneToMany(mappedBy = "todo", cascade = CascadeType.REMOVE) private final List<Comment> comments = new ArrayList<>(); @OneToMany(mappedBy = "todo", cascade = CascadeType.PERSIST) private final List<Manager> managers = new ArrayList<>();
7. N+1
-
해결 과정
fetch join을 이용하여 N+1을 해결합니다.
package org.example.expert.domain.comment.repository;

...

// AS-IS

public interface CommentRepository extends JpaRepository<Comment, Long> {

    @Query("SELECT c FROM Comment c JOIN c.user WHERE c.todo.id = :todoId")
    List<Comment> findByTodoIdWithUser(@Param("todoId") Long todoId);
}

// TO-BE

public interface CommentRepository extends JpaRepository<Comment, Long> {

    @Query("SELECT c FROM Comment c JOIN FETCH c.user WHERE c.todo.id = :todoId")
    List<Comment> findByTodoIdWithUser(@Param("todoId") Long todoId);
}
8. Querydsl
-
문제
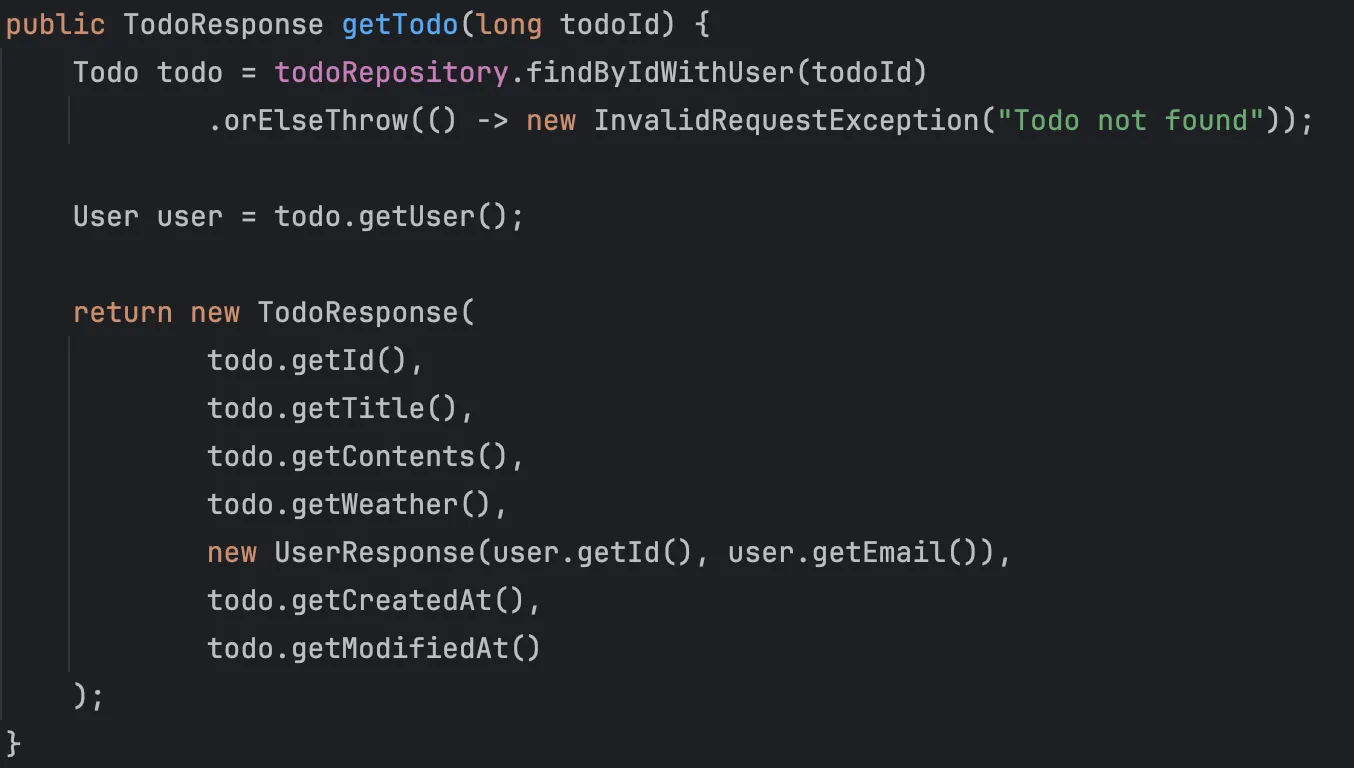
TodoService.getTodo 메소드
- JPQL로 작성된
findByIdWithUser를 QueryDSL로 변경합니다. - 7번과 마찬가지로 N+1 문제가 발생하지 않도록 유의해 주세요!
- JPQL로 작성된
-
해결 과정
1. Querydsl 의 상황과 대안
Querydsl을 사용하기 위해서는 별도의 의존성을 추가해야 합니다. 그런데 Querydsl은 2024년 1월 30일에 5.1.0 버전 release 이후로 업데이트가 되지 않고 있습니다. 사실 5.1.0 버전 이전에도 3년 가량 관리가 되지 않고 있었습니다. 지속적인 업데이트가 되지 않는 것 자체도 잠재적인 문제를 일으킬 수 있지만, 2024년에 SQL Injection 관련 보안 취약점이 발견된 것이 더 큰 문제였습니다.
https://nvd.nist.gov/vuln/detail/CVE-2024-49203
https://github.com/advisories/GHSA-6q3q-6v5j-h6vg
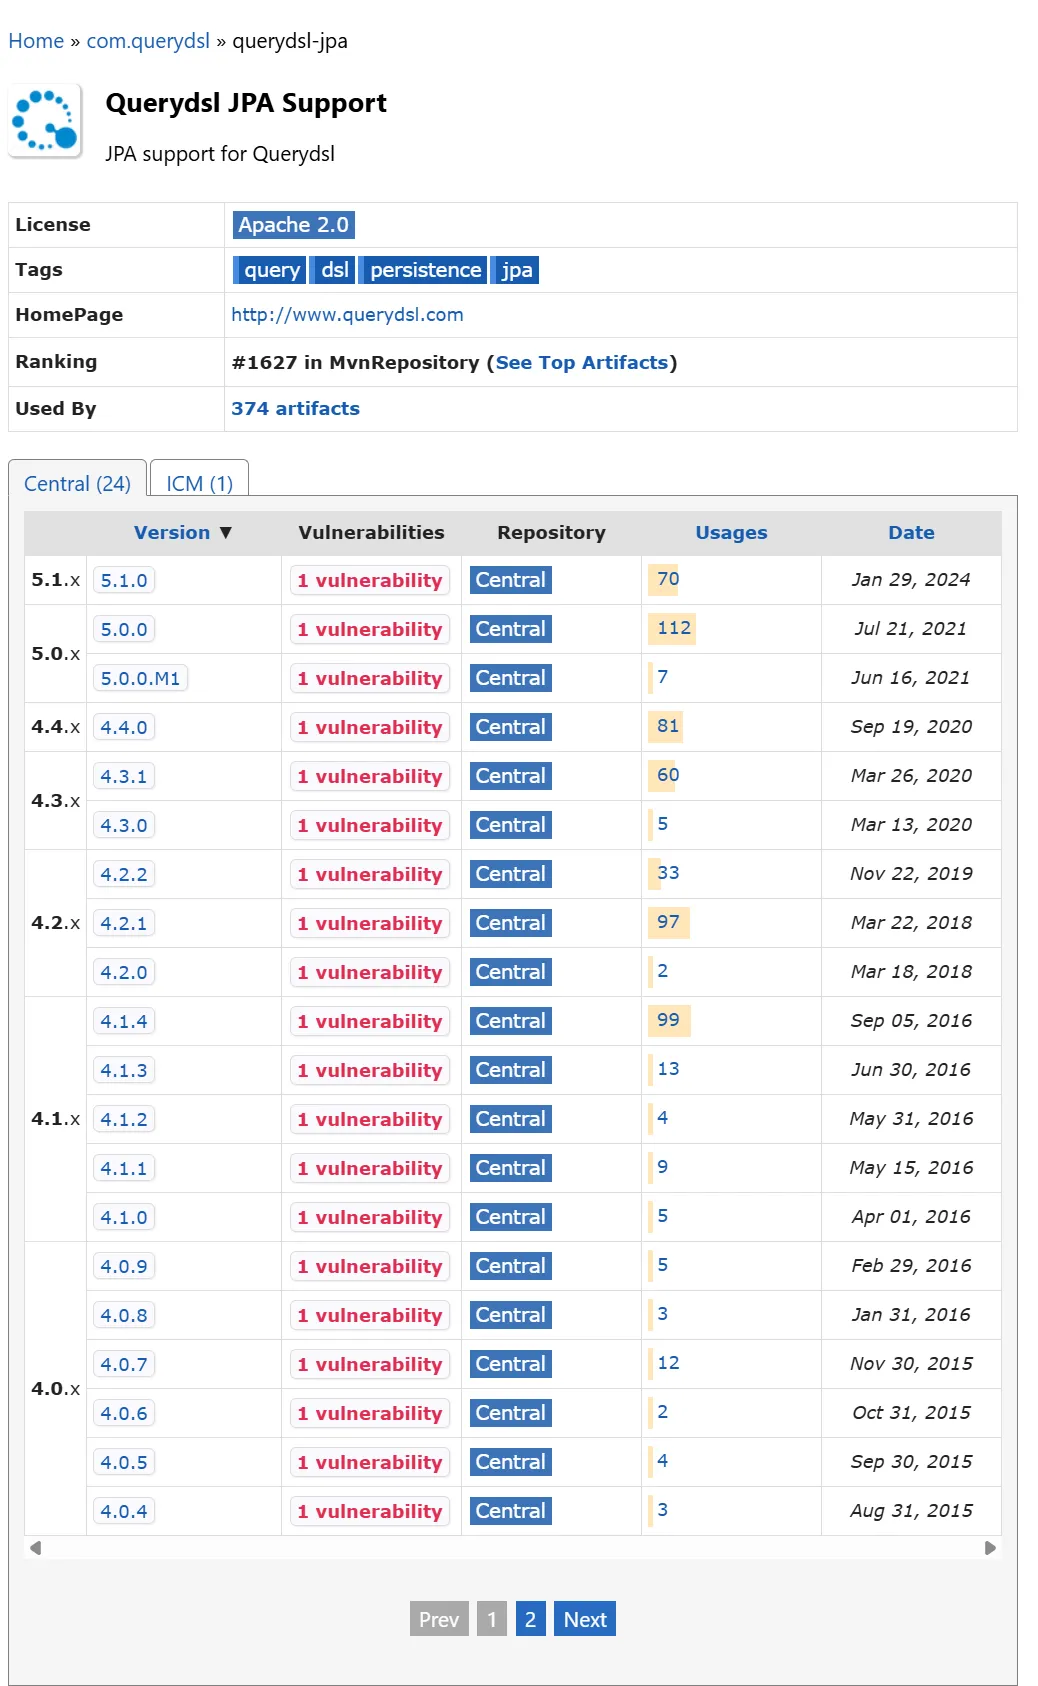
그러던 중에 OpenFeign이 Querydsl을 포크해서 유지보수를 하기 시작했고, 6.10.1 버전에서 보안 취약점을 해결했습니다. 그리고 2025년 6월 10일에도 7.0 버전을 release한 것으로 보아 어느 정도 유지보수가 되고 있는 것으로 보입니다.
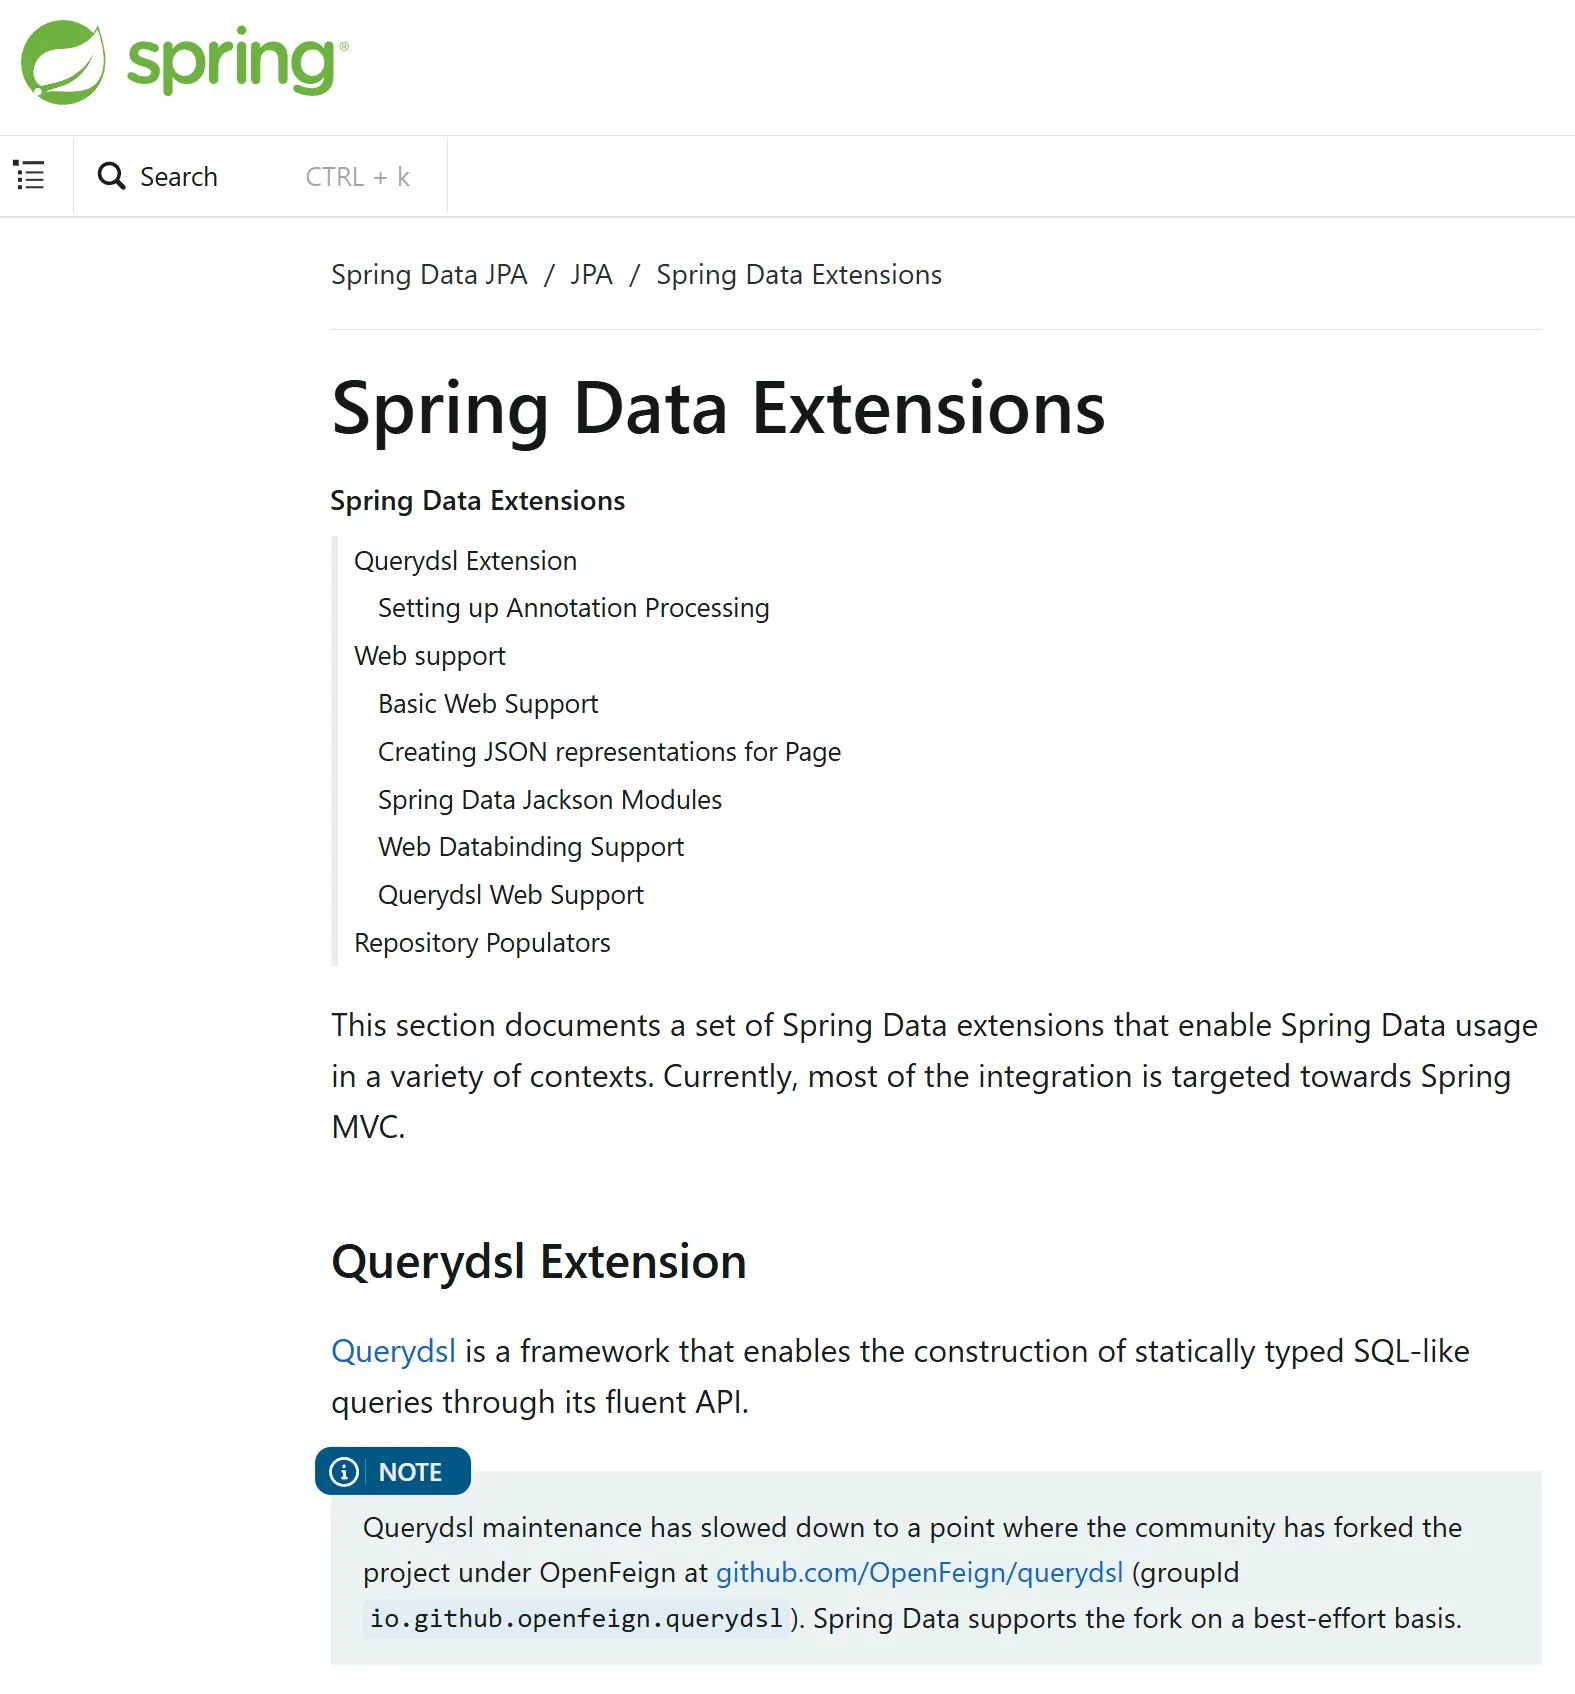
그리고 Spring 공식 문서에서도 확인할 수 있는데, 2025년 5월부터 Spring Data에서 OpenFeign의 querydsl을 지원하기로 명시하고 있습니다. 따라서, 다른 도구로 바로 전환하기 어려운 상황이나 querydsl을 반드시 사용해야 하는 상황에서는 OpenFeign의 querydsl을 대안으로 사용해야 합니다.
2. Querydsl 의존성 추가
 // build.gradle

 ...

    // querydsl (jakarta.annotation-api와 persistence-api는 querydsl-jpa에 포함되어 있음)
    implementation 'io.github.openfeign.querydsl:querydsl-jpa:7.0'
    annotationProcessor 'io.github.openfeign.querydsl:querydsl-apt:7.0:jpa'

...
Querydsl은 애노테이션 프로세서(Annotation Processor)를 사용하여 아래와 같이 동작합니다.
- Q-타입 생성: 우리가
@Entity어노테이션을 붙여 엔티티 클래스(예:Todo.java)를 만들면, 애노테이션 프로세서가 컴파일 시점에 이를 감지하여 해당 엔티티에 대한 쿼리용 클래스, 즉 Q-타입(예:QTodo.java) 소스 코드를 자동으로 생성합니다. - 생성된 코드 컴파일: 이렇게 자동으로 생성된
QTodo.java파일도 우리 프로젝트의 일부이므로, 다른 코드들과 함께 컴파일되어야 합니다.
Gradle은
annotationProcessor‘io.github.openfeign.querydsl:querydsl-apt:7.0:jpa’를 감지하고, 생성된 Q-타입 파일을 관례에 따라build/generated/sources/annotationProcessor/java/main에 저장합니다.혹시 별도로 생성할 경로를 지정한 경우에는 clean 태스크는 build 폴더만 삭제하기 때문에, 만약 엔티티가 바뀌어서 Q-타입도 새로 만들어야 하는 경우에는 수동으로 삭제를 해주거나 삭제를 하는 스크립트를 작성해야 합니다.
3. QueryFactory 사용을 위한 Config 추가
package org.example.expert.config;

import com.querydsl.jpa.impl.JPAQueryFactory;
import jakarta.persistence.EntityManager;
import jakarta.persistence.PersistenceContext;
import org.springframework.context.annotation.Bean;
import org.springframework.context.annotation.Configuration;

@Configuration
public class QueryDslConfig {

    @PersistenceContext
    private EntityManager em;

    @Bean
    public JPAQueryFactory queryFactory() {
        return new JPAQueryFactory(em);
    }
}
Spring Data JPA에서는
QuerydslPredicateExecutor,QuerydslRepositorySupport등의 방법으로 QueryDSL을 지원하고 있습니다. 하지만,JPAqueryFactory를 Bean으로 등록하고 필요한 곳에서 주입 받아서 사용하면 거의 모든 기능을 동일하게 그리고 더 편하게 사용할 수 있습니다.4. Custom Resository Interface 구현
QueryDSL을 사용하는 방법은 여러가지가 있는데, 간편하게 Query를 위한 전용Repository를 만드는 방법이 있습니다. 이 경우 구현은 간편하지만Service에서 여러Repository를 주입해야 하는 번거로움이 생깁니다.Spring Data Jpa의 공식 문서에는 fragment interface repository를 만들고,
repository를 조합하여 사용하는 방법을 권장하고 있습니다.항목 커스텀 인터페이스 방식 Query 전용 리포지토리 방식 구조 인터페이스 + 구현체 (상속 구조) 단일 클래스 (독립 구조) 서비스 계층 Base Repository 하나만 주입 Repository와 QueryRepository 각각 주입 장점 일관된 접근 방식 단순함, 보일러플레이트 없음 단점 다소 복잡한 구조 의존성이 나뉨 base respository를 두고, custom interfaces 를 정의한 뒤에 base repository 에서 다양한 custom interfaces를
extends하여 조합하여 사용합니다. 선언 순서를 통해 동일한 메서드에 대해서도 우선순위를 정할 수도 있습니다.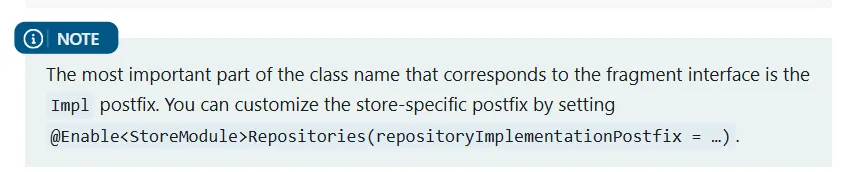
그리고 각 custom interfaces의 구현체를 구현하면 됩니다. 이 때 구현체의 이름은 인터페이스 뒤에 Impl 을 붙이도록 되어 있으며, 원하지 않는 경우 별도로 지정해야 합니다.
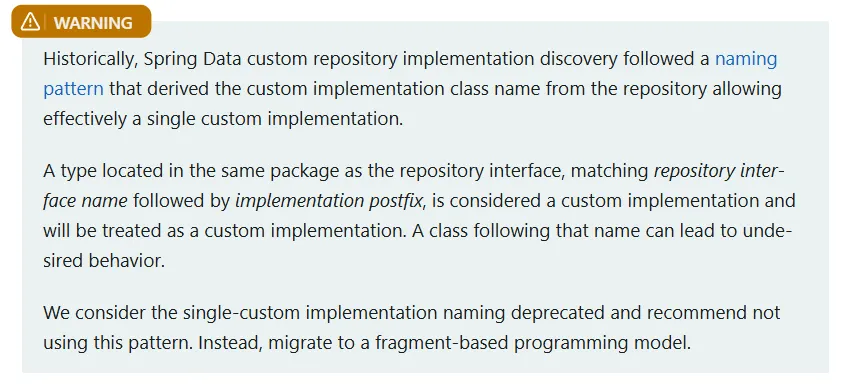
또한 이전에는 Base Respository의 이름의 뒤에
Impl을 붙여서 단일 구현체를 사용하기도 했으나, 지금은 프래그먼트 기반으로 각 custom interface마다Impl이 붙은 구현체를 구현하는 것을 권장하고 있습니다.따라서 저는
TodoRepositoryCustom이라는 custom interface을 먼저 정의했습니다.package org.example.expert.domain.todo.repository; import java.util.Optional; import org.example.expert.domain.todo.entity.Todo; public interface TodoRepositoryCustom { Optional<Todo> findByIdWithUser(Long todoId); }그리고
TodoRepositoryCustomImpl로 정의한interface를 구현했습니다. 문제에서JPQL로 작성된TodoRepository의findByIdWithUser메소드를QueryDSL로 전환하라고 했으므로, 해당JPQL을 참조하여 동일한 기능을 하면서 fetch join을 통해 n+1을 해결하도록 작성했습니다.이 때, 앞의
config에서 정의한JPAQueryFacotry를 주입 받아 사용합니다.package org.example.expert.domain.todo.repository; import com.querydsl.jpa.impl.JPAQueryFactory; import java.util.Optional; import lombok.RequiredArgsConstructor; import org.example.expert.domain.todo.entity.QTodo; import org.example.expert.domain.todo.entity.Todo; @RequiredArgsConstructor public class TodoRepositoryCustomImpl implements TodoRepositoryCustom { private final JPAQueryFactory queryFactory; @Override public Optional<Todo> findByIdWithUser(Long todoId) { return Optional.ofNullable(queryFactory.selectFrom(QTodo.todo) .leftJoin(QTodo.todo.user).fetchJoin() .where(QTodo.todo.id.eq(todoId)) .fetchOne()); } }마지막으로 BaseRepository인
TodoRepository에서 기존의 쿼리 메소드를 삭제하고, 직접 만든 프래그먼트 인터페이스를 extends 해줍니다.package org.example.expert.domain.todo.repository; ... // AS-IS public interface TodoRepository extends JpaRepository<Todo, Long> { @Query("SELECT t FROM Todo t " + "LEFT JOIN t.user " + "WHERE t.id = :todoId") Optional<Todo> findByIdWithUser(@Param("todoId") Long todoId); @Query(""" SELECT t FROM Todo t LEFT JOIN FETCH t.user u WHERE (:weather IS NULL OR LOWER(t.weather) LIKE LOWER(CONCAT('%', :weather, '%'))) AND (:startDate IS NULL OR t.modifiedAt >= :startDate) AND (:endDate IS NULL OR t.modifiedAt <= :endDate) ORDER BY t.modifiedAt DESC """) Page<Todo> findAllWithConditions(String weather, LocalDate startDate, LocalDate endDate, Pageable pageable); } // TO-BE ... public interface TodoRepository extends JpaRepository<Todo, Long>, TodoRepositoryCustom { @Query(""" SELECT t FROM Todo t LEFT JOIN FETCH t.user u WHERE (:weather IS NULL OR LOWER(t.weather) LIKE LOWER(CONCAT('%', :weather, '%'))) AND (:startDate IS NULL OR t.modifiedAt >= :startDate) AND (:endDate IS NULL OR t.modifiedAt <= :endDate) ORDER BY t.modifiedAt DESC """) Page<Todo> findAllWithConditions(String weather, LocalDate startDate, LocalDate endDate, Pageable pageable); }이렇게 JPQL을
queryDSL로 전환을 하면, Q-타입을 이용한 타입 안정성과 컴파일 시점 오류 검출 그리고 IDE 지원까지 여러 가지 장점을 얻을 수 있다고 생각했습니다. 물론 동적 쿼리 자체를 작성하는 것도 조금 더 편리하다고 생각합니다. - Q-타입 생성: 우리가
9. Spring Security
-
해결 과정
1. 의존성 추가
build.gradle

...

dependencies {

		...

    implementation 'org.springframework.boot:spring-boot-starter-security'
    testImplementation 'org.springframework.security:spring-security-test'

		...
2. JwtFilter
기본적으로
JwtFilter를 통해 사용자에 대한 인증을 하고, 필터 체인이 존재하는SecurityConfig를 통해 인가를 하도록 구성합니다. 기존에 존재하는ArgumentResolver의 로직을Spring Security에서 제공하는Authentication으로 대체합니다.package org.example.expert.config; ... @Slf4j @RequiredArgsConstructor @Component public class JwtFilter extends OncePerRequestFilter { private final JwtUtil jwtUtil; private final ObjectMapper objectMapper; @Override protected void doFilterInternal(HttpServletRequest httpRequest, @NonNull HttpServletResponse httpResponse, @NonNull FilterChain chain) throws ServletException, IOException { String authorizationHeader = httpRequest.getHeader("Authorization"); // 토큰이 없는 요청도 있을 수 있으므로, 토큰이 없으면 일단 다음 필터로 넘김 if (authorizationHeader == null) { chain.doFilter(httpRequest, httpResponse); return; } if (!authorizationHeader.startsWith("Bearer ")) { log.warn("잘못된 형식의 Authorization 헤더: {}", authorizationHeader); sendErrorResponse(httpResponse, HttpStatus.BAD_REQUEST, "잘못된 형식의 Authorization 헤더입니다."); return; } String jwt = jwtUtil.substringToken(authorizationHeader); if (!processAuthentication(jwt, httpRequest, httpResponse)) { return; } chain.doFilter(httpRequest, httpResponse); } private boolean processAuthentication(String jwt, HttpServletRequest httpRequest, HttpServletResponse httpResponse) throws IOException { try { Claims claims = jwtUtil.extractClaims(jwt); if (claims == null) { sendErrorResponse(httpResponse, HttpStatus.BAD_REQUEST, "잘못된 JWT 토큰입니다."); return false; // 검증 실패 } // SecurityContext에 인증 정보가 없으면 설정 (이미 인증된 경우 중복 설정 방지) if (SecurityContextHolder.getContext().getAuthentication() == null) { setAuthentication(claims); } return true; // 검증 성공 } catch (ExpiredJwtException e) { log.info("JWT 만료: userId={}, URI={}", e.getClaims().getSubject(), httpRequest.getRequestURI()); sendErrorResponse(httpResponse, HttpStatus.UNAUTHORIZED, "만료된 JWT 토큰입니다."); } catch (SecurityException | MalformedJwtException | UnsupportedJwtException e) { log.error("JWT 검증 실패 [{}]: URI={}", e.getClass().getSimpleName(), httpRequest.getRequestURI(), e); sendErrorResponse(httpResponse, HttpStatus.UNAUTHORIZED, "유효하지 않는 JWT 서명입니다."); } catch (Exception e) { log.error("예상치 못한 오류: URI={}", httpRequest.getRequestURI(), e); sendErrorResponse(httpResponse, HttpStatus.INTERNAL_SERVER_ERROR, "서버에서 오류가 발생했습니다."); } return false; // 검증 실패 } // JWT Claims에서 사용자 정보를 추출하여 Spring Security의 인증 정보 설정 private void setAuthentication(Claims claims) { Long userId = Long.valueOf(claims.getSubject()); String email = claims.get("email", String.class); UserRole userRole = UserRole.of(claims.get("userRole", String.class)); String nickname = claims.get("nickname", String.class); AuthUser authUser = new AuthUser(userId, email, userRole, nickname); Authentication authenticationToken = new JwtAuthenticationToken(authUser); SecurityContextHolder.getContext().setAuthentication(authenticationToken); } private void sendErrorResponse(HttpServletResponse response, HttpStatus status, String message) throws IOException { response.setStatus(status.value()); response.setContentType("application/json;charset=UTF-8"); Map<String, Object> errorResponse = new HashMap<>(); errorResponse.put("status", status.name()); errorResponse.put("code", status.value()); errorResponse.put("message", message); response.getWriter().write(objectMapper.writeValueAsString(errorResponse)); } }Authentication은AbstractAutehnticationToken을extends한 클래스를 만들어 차후에SecurityContextHolder에서 사용할 수 있도록 만듭니다.package org.example.expert.config; import org.example.expert.domain.common.dto.AuthUser; import org.springframework.security.authentication.AbstractAuthenticationToken; public class JwtAuthenticationToken extends AbstractAuthenticationToken { private final AuthUser authUser; public JwtAuthenticationToken(AuthUser authUser) { super(authUser.authorities()); this.authUser = authUser; setAuthenticated(true); } @Override public Object getCredentials() { return null; } @Override public Object getPrincipal() { return authUser; } }3. Filter Chain을 활용한 SecurityConfig 추가
JWT를 사용할 때는 필요 없는 기능들을 필터 체인을 통해 비활성화 합니다. 그리고 WebConfig 의 내용을 SecurityConfig의 필터 체인으로 대체하면서 인가의 역할을 하도록 합니다. hasRole을 활용하여 역할에 따라 접근 가능한 api를 구분합니다.
package org.example.expert.config;

...

@Configuration
@RequiredArgsConstructor
@EnableWebSecurity
public class SecurityConfig {

    private final JwtFilter jwtFilter;
    private final CustomAccessDeniedHandler customAccessDeniedHandler;
    private final CustomAuthenticationEntryPoint customAuthenticationEntryPoint;

    @Bean
    public PasswordEncoder passwordEncoder() {
        return new BCryptPasswordEncoder();
    }

    @Bean
    public SecurityFilterChain securityFilterChain(HttpSecurity http) throws Exception {
        return http
                .csrf(AbstractHttpConfigurer::disable)
                .sessionManagement(session -> session
                        .sessionCreationPolicy(SessionCreationPolicy.STATELESS)
                )

                // JWT 사용 시 불필요한 기능들 비활성화
                .formLogin(AbstractHttpConfigurer::disable)
                .anonymous(AbstractHttpConfigurer::disable)
                .httpBasic(AbstractHttpConfigurer::disable)
                .logout(AbstractHttpConfigurer::disable)
                .rememberMe(AbstractHttpConfigurer::disable)

                // 인증 & 인가 처리
                .authorizeHttpRequests(auth -> auth
                        .requestMatchers("/auth/**").permitAll()
                        .requestMatchers("/admin/**").hasRole(UserRole.ADMIN.name())
                        .anyRequest().authenticated())

                // 예외 처리
                .exceptionHandling((exceptionHandling) ->
                        exceptionHandling
                                .authenticationEntryPoint(customAuthenticationEntryPoint)
                                .accessDeniedHandler(customAccessDeniedHandler))
                .addFilterBefore(jwtFilter,
                        SecurityContextHolderAwareRequestFilter.class)

                .build();
    }
}
이 때,
SecurityConfig에서 발생하는 예외는Filter레벨인데,@RestControllerAdvice가 붙어 있는GlobalExcetpionHandler은filter레벨의 예외를 처리할 수가 없습니다. 따라서 별도로 처리를 해주어야 하기 때문에Spring Security가 어떻게exception을 처리하는지 살펴봤습니다.알아 보니
JwtFilter나Spring Security는AuthenticationException혹은AccessDeniedException을 던집니다. 인증에 대한 예외인AuthenticationException은AuthenticationEntryPoint를, 인가에 대한 예외인AuthenticationException은 **AccessDeniedHandle**를implements하는 클래스들을 만들어 직접 처리할 수 있습니다.저는 둘 다 정의하여 구현 후에 필터 체인에서
exceptionHandling을 통해 등록했고, 각exception들을catch했습니다. 그리고 해당 클래스들에서 직접 response를 보내는 대신 미리 정의한 통일된 응답을 사용하도록 미리 정의한 custom Exception과HandlerExceptionResolver의resolveException을 호출했습니다. 이렇게 하면GlobalExcetpionHandler으로exception처리를 위임할 수 있습니다.이 과정을 통해서
Filter레벨의 인증/인가 예외 처리를 위한 추가적인 코드를 생성하지 않으면서도, 예외 로직을 일원화할 수 있었습니다. 지금 보니 JWTfilter에서 예외를 직접sendErrorResponse를 통해 응답하고 있는데, 이것도 위임이 가능하니 불필요한 부분이라고 생각됩니다.4. @AuthenticationPrincipal 사용
마지막으로, 사용자 정보를 사용하기 위해
ArgumentResolver를 통해 유저 정보가 담긴 클래스를 정의했던 커스텀 어노테이션인@Auth를Spring Security에서 제공하는@AuthenticationPrincipal로 대체합니다. 이렇게 하면Spring Security도입이 끝나게 됩니다.package org.example.expert.domain.user.controller; ... @RestController @RequiredArgsConstructor public class UserController { ... @PutMapping("/users") public void changePassword(@AuthenticationPrincipal AuthUser authUser, @RequestBody UserChangePasswordRequest userChangePasswordRequest) { userService.changePassword(authUser.id(), userChangePasswordRequest); } }도전 기능에 대한 회고는 여기에 있습니다.